When you launch a custom golf stand bag as a business, the three decisions that shape everything downstream are the risk architecture you start from, the total number of SKUs you can sustain, and the MOQ you can actually hold — a typical program begins at 200 units per colorway with sampling in 10-20 days and bulk production in 45-60 days. This guide turns those decisions into a repeatable sourcing plan: which architecture carries a new brand safely, how to price and position SKUs without inflating inventory, and what to lock with your factory so your first season becomes the benchmark for every season after it. We write from an SGS-verified Quanzhou facility (4,950 sqm, 7 lines, 149 machines, 137 staff) that runs both OEM and ODM programs. For brands that want a fully customized silhouette — structure, dividers, pockets and hardware — our custom golf bag factory team specializes in OEM/ODM programs.
Key Takeaways
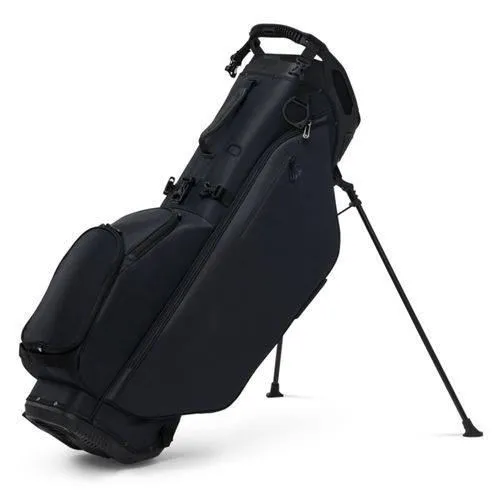
Before you read the detail, hold these five numbers and rules. First, a regular production order starts around 200 units per colorway, which keeps your landed cost realistic while still giving your factory a stable line to run. Second, sampling answers the "will it sell" question in 10-20 days, and bulk production fits inside 45-60 days, so you can hit a retail or tournament launch with confidence. Third, a two-to-three SKU starting stack — lightweight carry, a 14-way organizer, and possibly a waterproof model — covers the main buying intents without freezing cash in slow movers. Fourth, branding typically moves unit cost by 3-8%, so pick your logo method before you price. Fifth, the pre-production sample is the contract for the whole run: approve the actual fabric, placement, and color, not a screen image.
- Start with a proven architecture and brand it, rather than inventing a new structure
- Plan two-to-three SKUs max for a new brand; expand with sell-through data
- Lock materials, dividers, and hardware before sampling
- Set lab-dip color chips and a sealed master for reorder consistency
- Fit the QC checklist to the specific failure modes of your chosen architecture
Start With a Proven Architecture, Then Brand It
The single highest-leverage choice for a new business is deciding whether to start from an existing, production-tested stand bag architecture or to engineer one from scratch. For most brands the answer is the first option. A tested architecture has already solved the hard problems — the stand hinge geometry, the base stability angle, the strap anchor pattern, the divider rail layout — so your risk is concentrated in things you can actually inspect and approve, like material feel, weight, and branding. Going custom-structure on day one multiplies the failure modes you have to anticipate and the sample rounds you have to fund.
We build programs both ways. OEM means you bring your logo, colorway, and pocket refinements to an architecture we already production in volume, which is the fastest and most capital-efficient route. ODM means we co-develop the structure, materials, and hardware with you, which gives a more differentiated product but demands a longer sampling window and a clear technical brief. A sensible path for a younger brand is to launch OEM, capture sell-through data, and migrate promising SKUs to ODM once you understand which features your customers actually pay for.
Define the Customer and the Price Position First
Everything about a stand bag spec follows from a price point and a target player. A bag aimed at a value-oriented walker needs a simple pocket logic, a durable base, and a modest weight; a premium line aimed at a serious weekend golfer needs refined trims, a stable stand, and a lighter or better-organized shell. Write the intended retail price and the buyer profile into the brief before you choose material or divider count, because those two fields determine how much budget you have for lining, hardware, and branding.
We see the cleanest programs when the buyer states a target price band rather than a vague "premium" goal. The material direction and hardware grade flow directly from that number. At QUANZHOU JUNYUAN BAGS we ask where a bag will be sold, at what retail point, and who carries it, then we quote architectures that hit that band with the right reinforcement and finish. Getting this explicit on the first exchange shortens the whole sampling loop.
Limit the SKU Count in Season One
Inventory is the quiet killer of new golf bag brands. A catalog that reaches for men/women/junior, 14-way and 6-way, and waterproof and standard all at once multiplies your mold, material, and MOQ obligations before you have any sell-through evidence. We recommend a starting stack of two core SKUs plus one optional. The core pair is a lightweight carry bag for the walking buyer and a 14-way organizer for the organization-first buyer; the optional slot holds a waterproof model if you are selling into rainy, coastal, or high-end markets.
The argument for restraint is mechanical. Each new SKU costs you: a separate divider tooling or pattern set, material cutting and minimum fabric orders per colorway, a warehouse slot, and a QC record path. Two SKUs run fast, inspect cleanly, and teach you your real demand curve. When the data says an adjacent segment is selling, you add architecture deliberately rather than by guess. This is how a catalog stays profitable while it grows.
| Program Decision | Typical Starting Value | Buyer Notes |
|---|---|---|
| Regular MOQ per colorway | 200 units | Keeps line stable and landed cost competitive. |
| Test / sampling order | ~100 units | Validates sell-through before committing to bulk. |
| Sampling lead time | 10-20 days | Covers one to two sample rounds on a typical brief. |
| Bulk production lead time | 45-60 days | Schedule against a retail or event launch date. |
| Starting SKU stack | 2-3 models | Lightweight + 14-way, plus waterproof when applicable. |
| Branding cost impact | +3-8% unit cost | Method, placement, and color count drive the range. |
Browser the Product Shelf, Not Just the Image
A custom program is ultimately judged on the products shelf: the front logo is what the thumbnail shows, the lid logo appears on the second scroll, and the side panel gives a third impression in a retail photo. So plan your placement diagram before you finalize the shell. On a 14-way bag the front lower panel is the highest-visibility zone; the top lid is second; and a smaller tonal mark on the valuables pocket or lid adds detail without clutter. Avoid the stand hinge block, bottom wear plate, and strap anchor points, where flex and abrasion hit hardest.
Give the manufacturer coordinated measurements, not just "left chest." We place logo coordinates on the pattern with a tolerance, and we print the placement diagram into the tech pack so every unit in the run has the mark in the same spot. This is the difference between a bag that photographs consistently for retailers and one that drifts across batches. Branding is part of the structural spec, so brief it together with the pocket layout and divider count.
Material Direction and Reinforcement
The material direction sets weight, feel, and most of your failure modes. For a carry-focused line, 400D to 600D nylon or polyester offers the best balance of light weight and abrasion resistance; for a premium line, PU synthetic leather panels with upgraded trims raise perceived value; for rainy markets, TPU-coated or laminated waterproof fabrics protect the contents but add weight and seams to manage. Tell your factory the primary shell, the lining, and where you want reinforcement before sampling, and confirm the actual denier and finish rather than a color name.
Reinforcement is where cheap bags come undone. Stress points — the stand attachment panel, the two strap anchors, the base wear plate, and the pocket mouths — carry the most load and should be stitched and backed more heavily than the rest of the shell. In our QC workflow we set seam strength and tear strength targets at those seams and inspect them inline, not just at final check. Lock the reinforcement scope in the brief so a budget cut in production does not quietly remove it.
Pockets, Dividers, and the Access Logic
Pocket architecture decides how the bag is used and photographed. A clean program usually carries: an apparel pocket, a valuables or magnetic rangefinder pocket near the top, a ball pocket that does not fight the carry system, and on some models a cooler pocket. Define the list and the access logic — which pocket faces out on the course, which opens while the bag stands, which handles a rangefinder thumb reach — before sampling. A pocket that feels awkward in the hand will be the top review complaint for an otherwise good bag.
The divider is a separate decision with real cost and weight effects. A 4/5/6-way top is simpler and lighter; a 14-way organizer is heavier and more complex but meets the organization-first buyer. Full-length dividers reduce club tangle and protect grips, and they are a strong premium feature, but they add material and labor. State your divider config and whether you need full-length tubes in the same brief as your pocket list so the factory can quote the real construction.
The Stand System Is a Function, Not a Feature
The stand deployability is the one spec that separates a stand bag from every other golf bag, and it is the most common source of returns. Set pass criteria in the brief: how many deployment cycles the stand must survive, the stability angle on firm grass, the leg spread consistency, and the feel of the hinge. A target of roughly 3,000 to 10,000 deployment cycles with no cracking and no serious wobble is a reasonable starting point for most programs, and you can tighten it for premium lines.
We test the stand mechanism to the cycle target, inspect the hinge block, and measure base stability and leg alignment on every inspected unit. Because a wobbly stand triggers warranty claims fast, we treat the stand system as a core QC field rather than a cosmetic check. Put the cycle target and failure criteria in writing so both factories and buyers read the same acceptance bar.
Colorways, Trims, and the Bulk Consistency Rule
Bulk color consistency is where a brand either looks polished or falls apart. Approve a lab-dip or a physical color chip for every colorway, assign a Pantone reference rather than a screen approximation, and set a dye-lot tolerance so a thread or fabric lot change never shifts the tone. The same discipline covers trims: zipper pulls, buckles, D-rings, and logo plates should be color-banded so they sit quietly under the logo instead of fighting it.
Keep a sealed master unit from the approved sample for the life of the program. On reorders, the QC line compares every inspected unit against that master, so a relaunch two seasons later matches the original lockup. This is the concrete mechanism behind a repeatable brand, and it is cheap insurance compared with the cost of a tonal mismatch across thousands of units.
Packaging, Labeling, and Export Readiness
A custom bag that ships beautifully but arrives in a rattling carton or with the wrong fiber label creates returns and compliance headaches. Define the carton specification, inner packaging, and labeling early: the number of units per carton, the carton weight and dimensions for freight, the hang tag design, and any fiber-content or regulatory labels required in the destination market. These choices change your freight cost and your inspection result, so they belong in the original brief, not added at the end.
In our export process we confirm packaging and label details before bulk and include a packed drop test in the acceptance criteria. The test covers corner, edge, and face drops on the fully packed carton so you know how the product survives transit. Settling packaging early avoids a last-minute scramble that pushes your launch date.
Build the QC Checklist Around Your Failure Modes
A generic QC checklist catches generic problems; a custom program benefits from a checklist built around the specific risks of your architecture. If you run a lightweight carry bag, weight tolerance and stand-cycle life matter most. If you run a 14-way organizer, divider alignment and top wear are the fields to lock. If you run waterproof, seam sealing and zipper integrity lead the list. Name the top three failure modes you fear and put a test in front of each one.
We capture these fields on a standardized inspection record: PO number, model, colorway and material batch, sample size and sampling method, and the functional checks for stand deployment, zipper smoothness, strap anchors, and divider alignment. The record makes reorders consistent and gives you an audit trail if a retailer pushes back. On complex programs we encourage an inline inspection during bulk rather than only a final random check, because catching a defect early costs a fraction of fixing it at the container.
The Sampling Loop You Should Budget For
Plan for sampling that answers questions, not sampling that just shows a color. The pre-production sample must be made on the exact production fabric, with the approved thread and placement, so what you approve is what ships. A complex multi-place logo or a first-time ODM structure can take two sample rounds: one to validate the look and one to lock the technical file. Budgeting for two rounds at 10-20 days each keeps your launch realistic.
Order a small logo-position and wear run-down before a full container — even 50 to 100 units in a test order, which our MOQ structure on test runs supports around 100 units. Photograph the real lockup for your retailers, confirm placement on the production silhouette, and hand the unit to a few players for a weekend. That field feedback is worth more than another design meeting, and it catches the small issues that never appear in photography.
Plan the Unit and Landed Cost With Real Numbers
A custom program that looks profitable on paper can vanish under freight, duty, packaging, and rejects, so build a cost model before you negotiate. Start from the ex-works unit cost your factory quotes, then layer in: the material and hardware content, branding cost of 3-8%, the divisional and stand-system grade, packaging and labeling, ocean freight and any duty, plus a small allowance for inspection rejects and spare parts. Only when that landed number clears your retail margin should you lock the spec. We quote transparently so you can run this model instead of guessing.
There is a natural tension between a richer spec and a working margin, and the disciplined way to resolve it is to fix the landed number first and let the spec bend to it. If the margin is too thin, cut the features customers feel least — a second lining, an extra divider slot, a heavier zipper — rather than cutting the stand system or the base reinforcement, which drive returns. Keeping the cost model in the same spreadsheet as your QC checklist means a change in one updates visibility into the other, so your first pricing is also your defensible reorder pricing.
Choose a Factory You Can Audit and Repeat
A successful custom program is built on a relationship you can audit, not just a quote you can compare. The practical questions are not "is it cheap" but: can you see the line, is the QC record structured, will they hold a sealed master, and do they respond to an inline inspection request. Because your reorder depends on repeatability, the factory's documentation discipline matters as much as its machines. Our facility holds an SGS verification (March 2026, 4,950 sqm, 7 lines, 149 machines, 137 staff) and keeps a standardized inspection record per run so a season-two order starts from the same accepted baseline.
For a new brand, prefer a partner who will run a small test order and an inline inspection, because those two practices de-risk your first volume more than any price discount. Ask how a genuine defect is handled in writing, who owns rework cost, and whether a spare-parts or after-sales plan is available. When both sides agree on these operating rules in the brief, a reorder two years later runs on the same rails as your founding order.
Procurement Checklist: What to Put in Your First RFQ
- Target market/country and stated price positioning
- Bag architecture: lightweight carry, hybrid, 14-way, or waterproof
- Divider config (4/5/6/14-way) and whether full-length tubes are required
- Material direction, denier, finish, and reinforcement scope
- Pocket list and access logic
- Logo method, placement diagram, thread/film color references
- Target MOQ per colorway, lead time, and inspection standard
Recommended Internal Links
- Products (Stand Bag Architectures)
- OEM/ODM Service
- Factory & QC
- Golf Stand Bag Buying Guide
- 10 Factors When Buying Custom Stand Bags
- Creative Logo Ideas for Stand Bags
FAQ
How many SKUs should a golf bag brand start with?
Start with two to three: one lightweight carry, one 14-way organizer, and optionally a waterproof model. This covers the main buying intents without bloating inventory; you can expand after sell-through data arrives.
What is the typical MOQ for a custom golf stand bag program?
A regular production order is typically 200 units per colorway, while a test or sampling order can drop to about 100 units. Sampling runs 10-20 days and bulk production about 45-60 days.
Should a startup brand do OEM or ODM?
OEM is fastest because you brand a proven architecture; ODM lets you co-develop structure, pockets, and materials. Many new brands launch OEM to control lead time, then migrate to ODM once they understand their market.
Does customization always raise the unit cost?
Not always. Branding typically adds 3-8% and complex pocket or divider changes add more, but standardizing hardware, linings, and dividers across your catalog can keep cost and lead time stable while driving volume.
What documents do I need before requesting a quote?
A one-page brief helps most: bag type, target weight, divider config, material direction, pocket list, logo method, target MOQ, and timeline. Reference photos or a simple tech pack prevent misinterpretation.
How do I keep color consistent across multiple production runs?
Approve a lab-dip or physical color chip, assign a Pantone reference per color, set a dye-lot tolerance, and keep a sealed master unit. Consistent trims and hardware finishes also keep later runs in line.
What should an export golf stand bag include for packaging and labeling?
Define the carton spec, inner packaging, hang tag, and any regulatory or fiber-content labels up front. Confirm this early because it affects freight cost, inspection, and retail compliance.
Request a B2B quote for golf stand bags
Send your target market, expected MOQ, and reference photos. We respond within 24 hours with a sampling plan.